|
Biodiversity Data Journal :
Methods
|
|
Corresponding author: Vicki A Funk (funkv@si.edu)
Academic editor: Pavel Stoev
Received: 23 Dec 2016 | Accepted: 19 Jan 2017 | Published: 30 Jan 2017
© 2017 Vicki Funk, Morgan Gostel, Amanda Devine, Carol Kelloff, Kenneth Wurdack, Chris Tuccinardi, Aleks Radosavljevic, Melinda Peters, Jonathan Coddington
This is an open access article distributed under the terms of the Creative Commons Attribution License (CC BY 4.0), which permits unrestricted use, distribution, and reproduction in any medium, provided the original author and source are credited.
Citation:
Funk V, Gostel M, Devine A, Kelloff C, Wurdack K, Tuccinardi C, Radosavljevic A, Peters M, Coddington J (2017) Guidelines for collecting vouchers and tissues intended for genomic work (Smithsonian Institution): Botany Best Practices. Biodiversity Data Journal 5: e11625. https://doi.org/10.3897/BDJ.5.e11625
|
|
Abstract
The introduction of Next Generation Sequencing into the disciplines of plant systematics, ecology, and metagenomics, among others, has resulted in a phenomenal increase in the collecting and storing of tissue samples and their respective vouchers. This manual suggests standard practices that will insure the quality and preservation of the tissue and vouchers and their respective data. Although written for use by the Smithsonian Institution botanists it suggests a framework for collecting tissues and vouchers that other research programs can adapt to their own needs. It includes information on collecting voucher specimens, collecting plant tissue intended for genomic analysis, how to manage these collections, and how to incorporate the data into a database management system. It also includes many useful references for collecting and processing collections. We hope it will be useful for a variety of botanists but especially those who know how to collect plants and want to collect tissue samples that will be useful for genomic research, and those who are skilled in lab work and want to know how to properly voucher and record their tissue collections.
Keywords
genomic tissue, plant collecting, cryopreservation, biorepository, vouchers, botanical gardens, arboreta, biological collections, herbarium specimens
About this Training Manual
The Smithsonian Institution’s Department of Botany (includes the US National Herbarium; US) recently embarked on a project to voucher and collect genome quality tissue samples from the plants growing in mid-Atlantic botanical gardens, greenhouses, and arboreta (GGI-Gardens). This effort, funded by the Global Genome Initiative (GGI), is part of the Global Genome Biodiversity Network (GGBN;
Voucher Specimen Collection
What is a Voucher?
If possible, all samples of tissue stored for genomic use should be associated with a voucher specimen. Usually a voucher is all or a portion of a plant that is collected, preserved, and maintained as reference material in an herbarium (Fig.
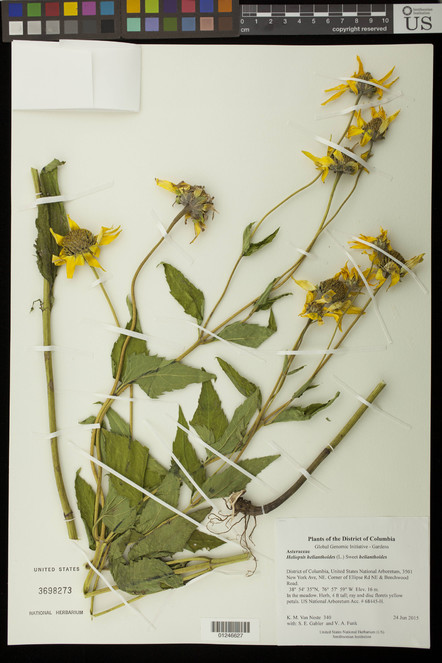
A “Specimen Voucher” from the US National Herbarium that is a dried, pressed herbarium voucher specimen with Catalog Number and specimen label. The collector + number is Van Neste 340, the sheet number is 3698273 and the specimen barcode is 01246627. doi for all figures 10.6084/m9.figshare.4496978
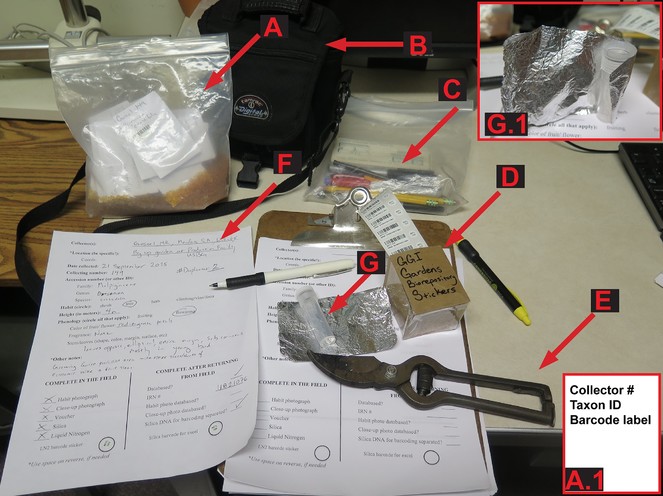
Example of a typical set of field equipment required for voucher specimen collection (for plant press and LN2 Dewar see Fig. 3). A. Bag with silica and envelopes, A1. Sample envelope, B. Camera, C. writing implements, D. Genomic sample barcode labels, E. clippers, F & F1. cryovial and aluminum foil, G & H. Data sheets. doi for all figures 10.6084/m9.figshare.4496978
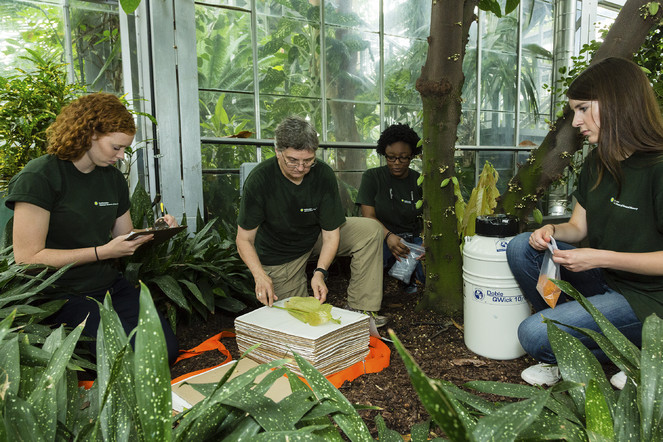
Example voucher specimen collection event with all necessary materials (from GGI–Gardens). From left to right: Sarah Gabler (summer undergraduate intern) is taking notes for the field book, V. Funk (Research Scientist, SI) is pressing the voucher specimen, Asia Hill (YES High School Intern) is preparing the tube for the liquid nitrogen sample, Kristen Van Neste (summer undergraduate intern) is waiting for leaf material to put into the coin envelope that will go into the orange silica gel in the reclosable polyethylene bag. [Photo courtesy of the Smithsonian Institution and GGI]. doi for all figures 10.6084/m9.figshare.4496978
Types of Vouchers
Herbarium voucher: a traditional museum specimen (Fig.
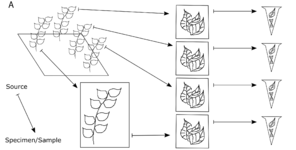

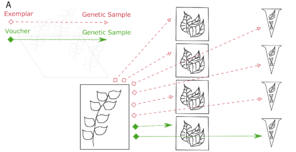
The physical relationships among samples (doi for all figures 10.6084/m9.figshare.4496978):
b: Every sample that is derived from another specimen/sample is a child of that specimen/sample. The original individual in the field is not cataloged, so it is not a parent. The bottommost DNA extract is a child of the bottommost tissue sample, which is a child of the voucher specimen.
c: Illustration of the Voucher and Exemplar designations. When genetic samples are taken directly from the pressed, dried specimen, that specimen is the voucher of those genetic samples. When genetic samples are taken from individuals that are different than the pressed, dried specimen, but are thought to be the same species, then the pressed, dried specimen is the exemplar of those genetic samples.
Exemplar voucher: a phenotypic voucher, an allovoucher, or a representative voucher. This is also a preserved, intact, specimen mounted on an archival, acid-free sheet and stored in an herbarium. If a specimen is an exemplar of a genetic sample, then the genetic sample is material taken from a different individual plant collected at the same time in the same place by the same person and deemed by the collector to be of the same species (Fig.
For example, if there are 20 ferns collected in an area and they are determined to be the same species, then one fern can be taken in its entirety to become a dried, mounted specimen and the fronds from the other 19 ferns can be taken as genetic samples; the dried, mounted specimen is an exemplar of those 19 genetic samples.
Other material as vouchers: There are other parts of the plant (e.g., seeds, fruits, wood, etc.) that can be mounted on an herbarium sheet, stored as bulky material or placed in a special collection (e.g., wood), and used as vouchers as long as the material is sufficient for identification. In addition, some groups (e.g., algae) or parts of plants may be stored in fluid in glass jars. One option is Copenhagen Solution: 70% industrial methylated spirit, 28% distilled water and 2% glycerol.
Photo voucher: a photograph of a plant with no physical specimen. This occurs when a physical genetic sample (leaf/petal/seed/root/etc.) is collected, but it is not possible to collect the plant or even a portion of the plant for an herbarium voucher and the photograph is the only evidence of the whole plant. This is not recommended. Because of the importance of an herbarium voucher (e.g., misidentifications) one should, when possible, make repeated trips to try and obtain an herbarium voucher (especially when the plants are in gardens or greenhouses). If a photo voucher is used, photographs should clearly indicate reproductive structures as well as habit and any characters that are useful for unambiguous species identification.
Living voucher: There has been some discussion about ‘living vouchers’, which occur when a plant is left alive in a greenhouse, arboretum, forest plot, etc. and referenced with location and/or accession information. Such vouchers should not be used and are not accepted in the NMNH database. One should always make a photo voucher if the plant cannot be collected.
What information should be collected in your field notes as a part of the voucher?
Appropriate label information is as essential as the material collected for the voucher (see label in Fig.
Biographic collector information
All voucher specimens must include a clear record of the full name (some data bases require a first name but others may accept initials) and affiliation (possibly in the footer of the label) of the primary collector as well as the collecting number. There should be a reference to all additional collectors. The primary collector furnishes the collecting number. Collecting numbers should be sequential from the beginning of the collector’s career until the end. It is recommended that collectors avoid using collecting numbers with dates or letters and especially avoid the practice of starting the numbering sequence over every year (using the year as the first part of the collecting number, e.g., 2016-101 which indicates the 101st collection of 2016). These habits can create confusion in many databases.
Geographic locality
The original location of the plant that has been made into an herbarium voucher is an important part of documenting biodiversity. All collectors must record detailed information regarding the locality that would allow subsequent researchers to revisit the exact location of the collection. Geographic locality information includes: Country, 1st political division (e.g., state); 2nd political division (e.g., county); nearest population center (e.g. town, village) and directions and distance to the collection site from that town; GPS coordinates; any physical landmarks or landscape features to help locate the specimen (e.g., adjacent to a river or stream, along a slope, next to a road, etc.); elevation; and any information on the substrate.
Biological and ecological character notes
Inevitably, a pressed, dried specimen will include only a fraction of biological and ecological information that the entire, living plant represents. Therefore, knowledge about this collection depends upon detailed notes regarding the state of biological and ecological characteristics related to this collection. Important information includes: taxonomic identification (if known), observations about the size of the specimen (height, width, etc.), habit, life history stage, features that are too large or difficult to collect, information about the color of physical characteristics (since this information can be lost during the preservation process), other organisms that are observed interacting with the collected specimen voucher (e.g., pollinators, herbivores), and other organisms growing on or nearby the collected specimen (e.g., ecosystem type). However, do not collect insects or other animals unless you have permits to do so. Clearly not all of this information will be available or necessary but the notes you make should be as detailed as possible, so as to place the specimen within the context of its living state.
Genetic sample tissue information
Genetic sampling is detailed in section III; however, the information that a specimen is a voucher for a tissue collection preserved for molecular work should be included both in the field notes and on the label of the specimen voucher. The field notebook should include the unique NMNH Biorepository number (a seven character alphanumeric number) for each genetic sample, the preservation method of the sample (liquid nitrogen, silica, etc.), and the relation of the sample to the specimen (voucher or exemplar). All genetic samples should be labeled with the primary collector’s last name and collecting number.
Preparing Dried Voucher Specimens in the Field
Vouchers are collected in the field, pressed, dried in a plant drier (or air dried in parts of the world where the ambient temperature is high and the humidity low), frozen for 4–5 days at –20Cº (-4Fº) to eliminate any pests, and finally affixed to an 11.5” x 16.5” archival herbarium sheet (varies in many herbaria especially in Europe). Skill in the pressing, drying and mounting processes will have a great impact on the final quality of the specimen. During the collection event, best practices for museum quality vouchers should be followed: make sure to include reproductive parts or other diagnostic features, use the entire plant with cleaned roots if it will fit on a standard herbarium sheet (11.5” x 16.5”), and the specimen should be arranged in an aesthetic manner with both surfaces of planar structures apparent (e.g., both sides of leaves visible). There are publications that detail collecting methods including many special techniques for some groups of plants such as bulky, large, succulent, or aquatic species (algae,
Ethanol Preserved Voucher Specimens
An alternative method of specimen preservation, especially in wet tropical environments where drying facilities are often unavailable, is to preserve them with ethanol prior to drying (use a 50–60 % solution depending on how long they will be stored prior to drying). This method prevents the decay of specimens for several months until they can be dried. Long-term storage in ethanol should be avoided. Ethanol preserved vouchers usually turn brown and any DNA extracted from them is often highly fragmented. To use ethanol preservation, voucher specimens are field pressed in newsprint, bundled, placed in a plastic bag and then saturated with ethanol. Other alcohols such as isopropanol can be used but the concentration should be closer to 70%. Bundles should be stored in a dark place until they are delivered to a drying facility and dried in a conventional manner. So far there have been no problems bringing such wet bundles back on airplanes as checked baggage, however any excess alcohol should be drained off and you should consider changing the papers). Bundles that have reduced alcohol content post transport can be frozen for temporary storage until they are dried without obvious affects on specimen quality. Using current methods, specimens preserved in alcohol are not useful for DNA extraction.
Genetic Sample Collection
Tissue Collections preserved in Silica Gel
How to Choose and Work with Silica Gel
Silica gel is used as a desiccant to rapidly dry recently collected plant tissues destined for DNA extraction (Fig.
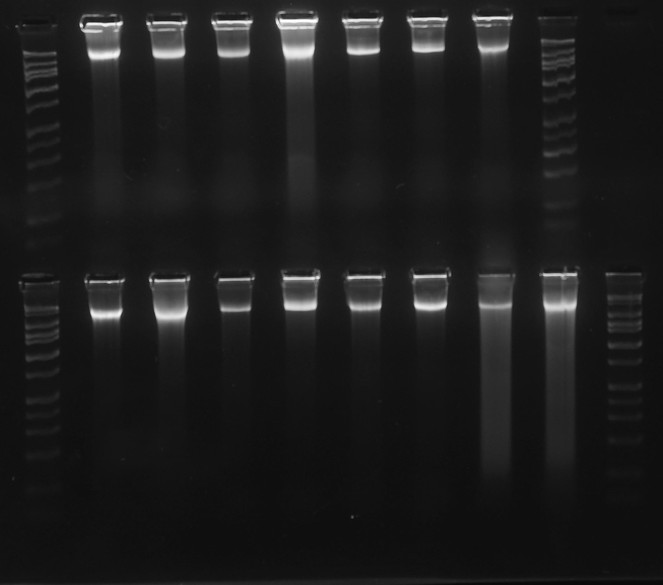
Gel image of high quality DNA (Vitaceae, ex J. Wen). DNA bands are tightly concentrated at the top of their lanes, with minimal streaking or blurring below. The HiLo gel ladder (Minnesota Molecular) at extreme left and right ranges from 50bp to 10,000bp. doi for all figures 10.6084/m9.figshare.4496978
To assess the saturation of silica gel (to know when to change it out for fresh silica gel), indicating gel is used which undergoes a color change when saturated. The recommend ratio of indicating to non-indicating silica is usually 1:10. Indicators on the market come in 3 versions: orange>>green (based on methyl violet), orange>>clear/white (based on iron III/II salts), blue>>pink (based on cobalt (II) chloride). We recommend the more ‘environmentally friendly’ orange>>clear/white. Avoid using blue indicating gel as cobalt (II) chloride is an irritant, a carcinogen, and can cause environmental damage. Orange/green is potentially safer but not totally innocuous as the methyl violet is toxic and mutagenic. Orange/green is potentially safer but not totally innocuous as the methyl violet is toxic and mutagenic. An alternative, and perhaps better, choice over indicating gel, especially for bulk drying, is the use of a relative humidity indicator card which provides a semi-quantitative measure of relative humidity (RH) (Suppl. material
To monitor moisture levels during storage, small amounts of indicator silica can be used or one can opt for relative humidity indicator cards; see Suppl. material
Once the plant material is dry the saturated silica gel can be exchanged for smaller amounts of fresh silica gel or a relative humidity indicator card (Fig.
Alternative methods of desiccation include salt (
How to Preserve tissue Samples in Silica Gel
When preserving plant material with silica gel, the goal is to gently dry samples as quickly as possible. The faster samples are dried, the higher the quality of DNA that can be extracted from them. Samples should be completely dried within 12–48 hours of collection, and should be dried in a cool, ambient-temperature environment (
Liquid Nitrogen Tissue Collection
For collection into liquid nitrogen, plant tissue samples are presently collected and placed into 8 ml, externally threaded cryovials with o-ring seals (Fig.
If LN2 is not available in the field, but LN2 collections are desired, one possibility is to bring germplasm (seeds, cuttings, plants) back from the field to grow locally. Genetic tissue samples could be cut from growing plants and deposited directly into LN2, and new voucher specimens collected directly from growing plants. Although it is labor and time-intensive, it provides excellent material under controlled conditions and for critical samples it is a viable alternative to working with LN2 at a remote collecting site.
Ethanol Tissue Collection
Historically, ethanol has been used to preserve animal tissues for DNA studies but not plant tissues. There has been some investigation in the use of ethanol for plant tissue preservation (
RNA Collection and Preservation
General precautions
Tissues collected for RNA extraction must be handled with additional care in order to prevent the activity of RNases, both endogenous and those introduced by environmental contamination. This is not trivial as RNases are nearly ubiquitous, sturdy enzymes that are hard to “destroy”. When working with these tissues, wear disposable gloves and use disposable forceps or treat them with RNase-Away. If the goal is to preserve the transcriptome, it is important to process the sample as quickly as possible to prevent changes due to altered physiological state after collecting. While plants are slow to die after being picked, changes in gene expression can occur much faster and it is best to get tissues into the preservation medium quickly after harvesting (within seconds to a few minutes). If field decontamination methods are needed working surfaces can be cleaned by flaming with a micro-torch, dipping/wiping in chloroform (evaporates without residue but is carcinogenic), or a commercial decontamination solution (RNaseZap, RNase Away; but needs an RNase-free water wash afterwards). RNA can also be preserved by flash-freezing or special preservative solutions such as RNAlater®.
RNAlater® is specified in its patent (US 6528641) as a solution “composed of 25 mM sodium citrate, 10 mM EDTA, 70 g ammonium sulfate/100 ml solution, pH 5.2”, although subsequent patents have suggested improvements on this basic recipe. Pre-prepared tubes of RNAlater® are the easiest method of preserving RNA. Leaf tissues should be cut into small pieces (≤0.5 cm2 in any single dimension) and 5-10 volumes of RNAlater® to allow complete penetration. One problem with plant tissues is that they typically wet poorly in RNAlater® and float. To mitigate this issue use small vials that can be filled completely so that tissue can stay submerged, or macerate submerged tissue with a scalpel. Once tissues are in RNAlater® they should sit at room temperature to 4°C for 12–24 hours, then frozen (-20°C or -80°C). While manufacturer guidelines indicate room temperature storage for up to a week will not affect quality (or up to a month at 4°C), in general, colder storage sooner is better. Long-term storage at -80°C is recommended. RNAlater® will freeze into an opaque white block at -80°C and must be thawed to remove tissues; preferably most RNAlater® is poured off prior to -80°C storage, which will allow selection of samples without thawing.
Standard LN2 (see above) is another effective preservation method for RNA but keep in mind the comments above concerning the time between the removal of the tissue from the plant and its preservation.
Samples in the NMNH Biorepository
Below, we discuss standard Biorepository specimen deposition methods. These methods are the most efficient and productive for long-term storage, databasing, sampling (genomic DNA and RNA). As always, specimen collection handling procedures should be performed with utmost care to ensure that the Biorepository collections are preserved according to the indefinite access and preservation goal of the Biorepository.
Storage of silica preserved collections in the Biorepository
Silica dried samples are stored in -80°C freezers in the Biorepository. The current setup is storage of databased, tissue-filled coin envelopes in Lock & Lock brand plastic boxes (HPL836), which are airtight with a clamping lid and gasket. Each box has a custom plastic grid inside, producing 6–9 compartments where envelopes or bags are stored upright. The grids are adjustable to fit both the standard coin envelopes and the slightly larger bags that have been in use in Botany (Suppl. material
Storage of liquid nitrogen preserved collections in the Biorepository
Samples selected for LN2 preservation are collected into 8 ml cryovials. These cryovials will be stored in 3”, 6x6 gridded fiberboard boxes in vertical metal racks in the Biorepository liquid nitrogen freezers. When returning from field, as soon as possible, be sure to take all liquid nitrogen samples to the Museum Support Center (MSC) to be deposited in the Biorepository.
Please try to follow the recommended collection methods (collection into coin envelopes and 8 ml cryovials). By setting forth these specific collection methods, we are minimizing the amount of processing and rehousing work that will need to be done to incorporate samples into the Biorepository. This would be most efficient (rehousing is a very time consuming process) and would protect the integrity of the samples the best (less risk of contamination, less physical handling of delicate dried samples, etc.).
Field Collecting Trips
Collecting Event Approval/ Permits
It is strongly encouraged that all collecting permits be acquired prior to departure. In some countries it is not possible to obtain a collecting permit before you arrive but the application process for a permit should be well underway before the collector departs. In addition, if you intend to bring or ship plants into the USA you need an APHIS permit.
Collectors planning to work in foreign countries should be cognizant of the Nagoya Protocol (The Nagoya Protocol on Access to Genetic Resources and the Fair and Equitable Sharing of Benefits Arising from their Utilization to the Convention on Biological Diversity) that has been ratified by 92 countries (but not the USA) and went into effect on 12 October 2014. Under the Nagoya Protocol there are obligations to share benefits based on the utilization of genetic resources and there is a requirement for potential users to seek Prior Informed Consent (PIC) and to negotiate Mutually Agreed Terms (MAT) with governments and local indigenous peoples that hold traditional knowledge associated with the genetic resources (
Some of the information below is specific to the US National herbarium (US), however, it should be useful as a guide to what can be put in place at other institutions. Specifically the text of this document is available in a Word format and the the FIMS spread sheet is available in Excel.
Obtaining Acquisition Number for Collecting Event
At US, once the collecting event has been organized you must contact the Acquisition Manager to receive an EMu Acquisition Number (previously referred to as the Accession Number or OR Number) and biorepository barcodes for the event.
NMNH Field Information Management System (FIMS) database
If you chose to use the NMNH FIMS (Field Information Management System) to generate a FIMS spreadsheet for recording specimen data, you should consult NMNH Informatics for assistance in selecting the appropriate fields for your collection trip. If you use FIMS it will ensure that collection events are linked with genetic samples and photos. If you chose to use a standard Excel spread sheet, make sure the fields match those required in the FIMS. The Botany Acquisition Manager or Botany IT office can supply you with such a spreadsheet. The Botany IT office has templates tailored for field collections (including tissue samples) which are designed for both vouchered genetic samples, and for genetic samples when the voucher is deposited elsewhere. Alternatively if you have only a few collections you may choose to enter your data directly into EMu upon your return to NMNH. This is especially useful if you are collecting locally. All alternatives to the NMNH FIMS database should be approved by the relevant departmental Information Technology staff. Collectors working in other institutuions should consult their Collections Management team for information.
NMNH Biorepository Labels
The Biorepository will assign a range of Biorepository numbers and adhesive labels to label tissue samples in cryovials and envelopes. Please request labels from the Biorepository Manager at least two weeks prior to departure. The Biorepository will also provide a spreadsheet with the Biorepository numbers and FreezerPro “barcode”. You should copy and paste the assigned numbers into your FIMS or other spreadsheet rather than hand-typing them into the designated field to reduce the chance of errors.
In the Field
When entering information in the FIMS or to your spreadsheet, you must enter a separate record (a separate row on the spreadsheet) for every voucher specimen and genetic sample that you collect. This includes pressed voucher specimens, leaves/tissue collected in coin envelopes, leaves/tissues collected in 8-ml cryovials, and any material that is collected into a Matrix plate (uncommon for Botany collections). For example, for Funk collection 13245, Funk-13245 would be the voucher, Funk-13245.1 might be the cryovial, Funk-13245.2 might be a silica sample, Funk-13245.3 might be a photo, etc. When you are collecting genetic samples from vouchers to ultimately deposit in the Biorepository, you must remember to add Biorepository ID barcodes to Biorepository items. The LN2 cryovial will have a unique barcode label and corresponding circular sticker as will the silica gel coin envelope. The circular stickers should be placed in the field notebook or on the original collection sheet (Fig.
After collection of specimen vouchers
- Plant presses should be placed in an appropriate plant dryer to dry the specimens (either in the field or at NMNH). Presses should be checked daily, turned, and tightened. Most specimens will dry in 2–4 days. Do not leave presses in a dryer longer than 2 days without checking them and removing the dry specimens.
- Once the dried specimens arrive at NMNH, they must be frozen as part of Botany’s Integrated Pest Management protocol before entering offices or areas of the permanent collection (see below).
- When the specimens are available the Acquisition Number (formerly the Accession Number or OR Number) in EMu needs to be updated. The collector should work with Acquisition Manager to complete the Acquisition information. The collector will also need to provide a copy of all collecting and export permits (if applicable), an SI travel authorization (if you traveled on one), and the collector and collection number range to the Acquisition Manager. The Acquisition Number is needed for the drop tag that accompanies all bundles of plants when they move around the herbarium and go to plant mounting.
- All collection data must be entered into EMu. As mentioned above, there are three options for entering the data:- label information may be entered into the NMNH-FIMS (usually in the field);- data can be recorded in a customized Excel spreadsheet, either in the field or when you return, or- data can be typed directly into EMu (for a few specimens)If the collector has not used any of these methods before, the Botany IT Office will provide training. The person entering the data must be sure that all data, Acquisition Numbers, etc. are entered in the correct tab. The entry of these data into EMu is the responsibility of the collector unless prior arrangements have been made. When the voucher data are added to EMu an Internal Record Number (IRN) will be generated for each specimen. If the collector uses the FIMS spreadsheet, or an approved Excel spreadsheet, with all the field data, preliminary identifications, and Acquisition Number on each record it can be submitted to the Botany-IT staff for uploading into EMu.
- Voucher specimen labels can be printed from EMu. The Botany IT office has designed a number of “reports” in EMu that allow the collector to print labels and new “reports” can be developed in cooperation with the IT Office.
- The “Primary Collector + Primary Collector’s Number” together form the unique identifier for the voucher when it is collected in the field. Later, once the specimen is mounted, the US Herbarium catalog number becomes the primary identifying number. The Primary Collector + number (e.g., Funk 12345) is used to link all associated genetic samples (tissues, DNA extracts) as well as photos, and other collected items (e.g., wood samples). It is recommended that all tissue samples be assigned a unique Sample ID (or Tissue ID) Number derived from the Primary Collector + Primary Collector Number. The suggested standard is to take the Primary Collector name + number, and append an additional number for every related tissue. For example, if five separate samples are collected from Funk 12345, then those should be assigned the sample ID numbers (e.g., Funk-12345.1, Funk-12345.2, Funk-12345.3, etc.).
- Samples preserved in LN2 and silica should be transported to the Biorepository at the Museum Support Center (MSC) as soon as possible. This provides them with safe storage and handling even before the data are entered into EMu. In addition, each tissue sample is given a Biorepository number (a seven-character alphanumeric; e.g., AB3DE67). These numbers are printed on Biorepository labels and the labels should be attached to each tissue sample (cryovial, coin envelope, etc.). The corresponding circular 2D barcode label should be affixed to the field notes close to the entry for the voucher specimen from which the sample was taken. Silica gel envelopes and liquid nitrogen tubes will each be given a unique Biorepository number, so it should be clear to which sample suffix each sticker refers.
An example (very abbreviated) dataset might look like this:
Funk 12345: Dionaea muscipula J.Ellis ex L., US Botanic Garden, 9 June 2016.
Funk-12345.1: Leaf, silica dried. (AB3DE67)
Funk-12345.2: Leaf, liquid nitrogen preserved. (AB3DE68)
Funk 12346: Carnegiea gigantean (Engelm.) Britton & Rose, US Botanic Garden, 19 June 2016.
Funk-12346.1: Leaf, silica dried. (AB3DE69)
Funk-12346.2: Flower, silica dried. (AB3DE70)
Funk-12346.3: Leaf, liquid nitrogen preserved. (AB3DE71)
Funk-12346.4: Flower, liquid nitrogen preserved. (AB3DE72)
-
After the collections are deposited in the Biorepository:a) If Biorepository numbers were not provided prior to collection, the Biorepository will provide the collector with a spreadsheet listing each sample’s Biorepository number and Sample Field ID. Be aware that this is a slower, labor-intensive process and should be avoided, if possible. The collector adds the Biorepository number to their field data along with the other collection data. Remember for Botany, the Voucher & Sample Field IDs are the Primary Collector’s Name + Number, followed by a number suffix for each sample. Manual entry or import (preferred) of the Biorepository number to EMu will link the genetic sample records to the corresponding Biorepository records in FreezerPro. So, to be clear, the inclusion of the Biorepository number in an EMu sample record (by the collector, their designee, or Botany IT) triggers the linking of that record to the corresponding Biorepository record in FreezerPro.b) If the collector or designate is entering the data directly into EMu, permission must be granted by Botany IT.
-
Photographs are treated the same way as genetic samples. Photos can be individually attached to the appropriate EMu Catalog records by the collector or designate, or the required information can be added to a spreadsheet and submitted to Botany IT for batch upload. The fields needed are the Primary Collector + number, the voucher Catalog record IRN, the image filename, and a description (e.g., habit, flower, fruit). If there is more than one image for the same voucher, each should have Primary Collector + number and IRN repeated for each image.
-
Labels are the responsibility of the collector unless prior arrangements have been made with the IT staff. Once voucher information is entered into EMu, labels can be generated directly from the database or from the collectors own label program.
-
Labels should be added to the vouchers and tied into ca. 25 sheet bundles with appropriate drop tag and Acquisition number and submitted for mounting.
Anyone wishing to contribute collection data should check with the Botany IT office to make sure they have the appropriate spreadsheet or have completed Botany FIMS or EMu training. When using EMu one indicates that a specimen is the voucher of a genetic sample, by entering the Primary Collector’s Name and Number in the Voucher Field ID field of the genetic sample row. In addition, specify the type of voucher in the Voucher Type field. Be sure to include the sample preservation method. See Fig.
Remember all genetic sample and voucher collections need to be data based in one of three ways: a) through the NMNH FIMS database, b) using the specially designed Excel spread sheet obtained from the Botany department IT office, or c) entered directly into EMu.
A flow chart that summarizes the steps involved in vouchering specimens and making genomic quality tissue samples can be found in Fig.
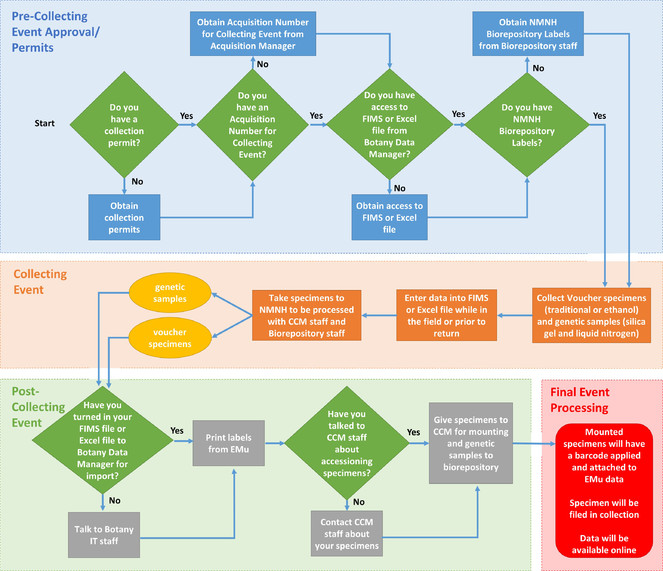
Flow Chart illustrating the GGI-Gardens sampling strategy. Extracted from a poster entitled “Incorporating Genetic Sampling into a Traditional Botanical Voucher Workflow” presented at the GGBN meeting in Berlin, June 2016, by Melinda Peters and Amanda M. Devine (US). doi for all figures 10.6084/m9.figshare.4496978
For GGI partners
All GGI collections need to be databased, available on line, and deposited in a GGBN facility. Non-NMNH affiliated collectors should consult their home institution for database and/or collections database procedures.
Acknowledgements
We thank our colleagues who took the time to read this document and provide helpful comments including Chris Huddleston (NMNH Biorepository), Tom Hollowell (NMNH Office of Information Technology), and Katherine Barker (GGI). Reviewer Thomas Couvreur provided many helpful comments. We also appreciate the help of Kristen Van Neste and Sarah Gabler, interns at NMNH during the summer of 2015, who helped with the first summer of collecting in gardens in the Mid-Atlantic region. Finally, we would be remiss if we failed to thank our partners in this effort for their help in establishing this program and their assistance in our collecting efforts: US National Botanic Garden and their Production Facility (Architect of the Capitol), US National Arboretum (US Department of Agriculture), Smithsonian Gardens, and the NMNH Department of Botany greenhouse. This document is possible only because of the funding and other support we received for the collecting and processing of the plants. The main funding sources were all from NMNH and included the Global Genome Initiative (NMNH), Department of Botany, and the Biological Diversity of the Guiana Shield Program. Considerable assistance was provided by PenSoft staff, especially Pavel Stoev. Torsten Dikow helped the corresponding author become accostomed to the arpha writing tool.
References
- DNA Banking for the 21st Century: Proceedings of the U.S. Workshop on DNA banking.Missouri Botanical Garden,187pp.
- A Comparison of Two New Methods of Preparing Cacti and Other Stem Succulents for Standard Herbarium Mounting.Taxon34(1):118. https://doi.org/10.2307/1221573
- A simple and safe method for rapid drying of plant specimens using forced-air space heaters.Selbyana,87pp.
- Notes on the collection of Zingiberaceae.Flora Malesiana Bulletin29.
- The Conservation and Art Materials Encyclopedia Online. http://cameo.mfa.org/wiki/Alpha_cellulose
- Salt drying: a low-cost, simple and efficient method for storing plants in the field and preserving biological repositories for DNA diversity research.Molecular Ecology Resources14(2):344‑351. https://doi.org/10.1111/1755-0998.12170
- Silica Gel: An Ideal Material for Field Preservation of Leaf Samples for DNA Studies.Taxon40(2):215. https://doi.org/10.2307/1222975
- A guide to collecting herbarium specimens of ferns and their allies. http://www.anbg.gov.au/fern/collecting.html
- Chapter 27 Collecting herbarium vouchers. In Collecting Plant Diversity; Technical Guidelines.Bioversity InternationalURL: http://cropgenebank.sgrp.cgiar.org/index.php?option=com_content&view=article&id=663
- Hints for hard-pressed collectors.Watsonia1URL: http://www.biodiversitylibrary.org/bibliography/83809#/summary
- A Guide to Collecting Palms.Annals of the Missouri Botanical Garden73(1):166‑176. https://doi.org/10.2307/2399148
- Interim and archival preservation of plant specimens in alcohols for DNA studies.BioTechniques20(4):657‑660.
- Manual for Tropical Herbaria.International Bureau for Plant Taxonomy and Nomenclature1‑132.
- The importance of vouchers.Taxon54:127‑129. URL: http://www.jstor.org/stable/25065309?seq=1#page_scan_tab_contents
- A Standard Protocol for Liana Censuses 1.Biotropica38(2):256‑261. https://doi.org/10.1111/j.1744-7429.2006.00134.x
- A workflow to preserve genome quality tissue samples from plants in botanical gardens and arboreta.Applications in Plant Sciences-Protocal Note.
- The Origami of Botany: A Guide to Collecting and Mounting Specimens of Cyclanthaceae.Annals of the Missouri Botanical Garden74(4):897. https://doi.org/10.2307/2399456
- Techniques for Collecting Aquatic and Marsh Plants.Annals of the Missouri Botanical Garden71(1):229. https://doi.org/10.2307/2399065
- A technique for collecting botanical specimens in rainforests.Flora Malesiana Bulletin26:2038‑2040.
- A Hand Book of Ethnobotany.Bishen Singh Mahendra Pal Singh,322pp.
- Manual de Herbario: Administracion y manejo de colecciones, tecnicas de recoleccion y preparacion de ejemplares botanicos.National Council of the Flora of Mexico,142pp.
- Miller A, Nyberg J (1995) Collecting herbarium vouchers. In: Guarino L, Ramanatha Rao V, Reid R (Eds) Collecting Plant Diversity; Technical Guidelines. URL: http://cropgenebank.sgrp.cgiar.org/images/file/procedures/collecting1995/Chapter27.pdf
- Reaching the Rainforest Roof- A Handbook on Techniques of Access and Study in the Canopy.Leeds Philosophical and Literary Society and UNEP, Leeds,36pp.
- A Guide to Collecting Lecythidaceae.Annals of the Missouri Botanical Garden74(2):321. https://doi.org/10.2307/2399402
- Tropical Plant Collecting: From the Field to the Internet.TECC Editora,Florianópolis, Brazil,352pp.
- Neubig K, Whitten W, Abbott J, Elliott S, Soltis D, Soltis P (2014) Variables affecting DNA preservation in archival plant specimens. In: Applequist W, Campbell L (Eds) DNA banking for the 21st century: Proceedings of the U.S. Workshop on DNA Banking.Missouri Botanical Garden: St Louis
- Nicolson D (1965) Collecting Araceae. In: Fosberg F, Sachet M (Eds) Manual for Tropical Herbaria. Regnum Vegetabile 39. International Bureau for Plant Taxonomy and Nomenclature, Utrecht.
- Phylogenies without roots? A plea for the use of vouchers in molecular phylogenetic studies.Molecular Phylogenetics and Evolution48(1):369‑371. https://doi.org/10.1016/j.ympev.2008.03.024
- Observing, photographing, and collecting plants / Kenneth R. Robertson.Illinois Natural History Survey,84pp. https://doi.org/10.5962/bhl.title.46166
- The New Age of the Nagoya Protocol.Nature Conservation12:43‑56. https://doi.org/10.3897/natureconservation.12.5412
- Global Genome Biodiversity Network: saving a blueprint of the Tree of Life – a botanical perspective.Annals of Botany118(3):393‑399. https://doi.org/10.1093/aob/mcw121
- algae Research: Collection and Preservation. http://botany.si.edu/projects/algae/collpres.htm
- Preparing Herbarium Specimens of Vascular Plants.USDA Agricultural Information Bulletin348.
- A Guide to Collecting Bamboos.Annals of the Missouri Botanical Garden70(1):128. https://doi.org/10.2307/2399010
- Three pleas to collectors - improve your field data.Flora Malesiana Bulletin30.
- A rapid and inexpensive method for isolation of total DNA from dehydrated plant tissue.Plant Molecular Biology Reporter8(4):297‑303. https://doi.org/10.1007/bf02668766
- Plant collecting and herbarium development: a manual.Food and Agriculture Organization of the United Nations: Rome,137pp.